Showing posts with label player. Show all posts
Showing posts with label player. Show all posts
Saturday, October 19, 2013
MP3 Player Booster Circuits
MP3 players are all the rage these days. The smaller ones in memory-stick format are particularly easy to take with you; your very own ‘personal sound system’ on the move! It’s when you want others to share your taste in music that you find these players to have a lack of power. You can get round this problem with the help of the MP3 booster, a small amplifier that can be used to connect your MP3 player directly to your Hi-Fi. When you next invite your friends to a party you can ask them to bring their ‘personal music’ as well as the usual drinks!
But first we have to build this booster! The small battery-powered players have an output signal that is more than sufficient to drive a set of 32 Ohm headphones. You’ll often find that with an output of 1mW the sound pressure level (SPL) produced can reach up to 90 dB. This would be sufficient to cause permanent damage to your hearing after only one hour! The maximum output voltage will then be around 200mV. This, however, is insufficient to fully drive a power amplifier. For this you’ll need an extra circuit that boosts the output voltage.
Power amps usually require 1 V for maximum output, hence the signal has to be amplified by a factor of five. We will also have to bear in mind that quieter recordings may need to be amplified even more. We’ve used a simple method here to select the gain, which avoids the use of potentiometers. After all, the MP3 player already has its own volume control. We decided to have two gain settings on the booster, one of three times and the other ten times. Amplifiers IC1A and IC1B (for the right and left channels) are housed in a single package, a TS922IN.
The output signal of the MP3 player is fed via a stereo cable and socket K1 to the inputs of the amplifiers. The gain depends on the relationship between resistors R2 and R1 (R6 and R5 for the other channel) and is equal to ten times. When you add jumper JP1 (JP2), resistor R3 (R7) will be connected in parallel with the negative feedback resistor R1 (R6), which causes the gain to be reduced to about three. When you start using the booster you can decide which gain setting works best for you.
Circuit diagram:
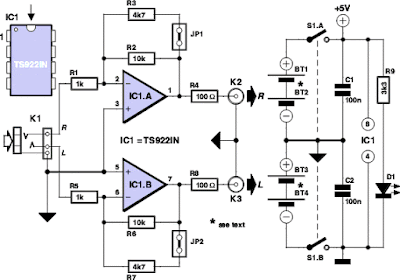
MP3 Booster Circuit Diagram
Resistor R4 (R8) takes the amplified MP3 signal to the output socket K2 (K3). A cable then connects these phono sockets to the input of your power amplifier. The resistors connected in series with the output (R4 and R8) are there to keep the booster stable when a long cable is connected to its output. Cables have an unwelcome, parasitic capacitance. This capacitive effect could (due to phase shifts of the signal) affect the negative feedback of the booster in such a way that a positive feed back occurs, with the result that the booster oscillates and possibly damages the power amplifier!
The resistors (R4 and R8) effectively isolate the output of the booster from the parasitic capacitance of the output cable. They also protect the booster outputs from short circuits. We’ve used a TS922IN opamp in this booster because it can operate at very low supply voltages (the maximum is only 12 V!), but can still output a reasonable current (80 mA max.). For the supply we’ve used rechargeable batteries (e.g. NiCd or NiMH cells) so that we don’t need a mains supply.
To keep the number of cells required as small as possible, we’ve chosen a supply voltage of 5 volt; this can be supplied by four rechargeable batteries. It is also possible to use four ordinary, non-rechargeable batteries; it’s true that the supply voltage then becomes a bit higher (6 Volts), but that won’t cause any harm. Since we’ve used a symmetrical supply for the booster (2 x 2 batteries), it will be easiest if you use two separate battery holders, each with two AA cells. The two holders are connected in series.
Make sure that the batteries are connected the right way round; the positive of one always has to be connected to the negative of the next. This also applies to the connection between the two battery holders. S1A/B is a double pole switch, which is used to turn both halves of the battery supply on or off simultaneously. If you can’t find the (dual) opamp we’ve used (or an equivalent), you could always use standard opamps such as the NE5532, TL082 or TL072. These do need a higher supply voltage to operate properly. In these cases you should use two 9 V batteries and replace resistor R9 with a 15 kΩ one.
Do take care when you connect the circuit to your power amplifier because the output signal can be a lot larger and you could overload the power amplifier. (Although you’re more likely to damage the loudspeakers, rather than the amplifier!) (Please note that these two 9 V batteries can’t be used as a supply for the TS922IN!) In our circuit we’ve used a stereo jack socket for the input and phono sockets for the output because these are the most compatible with MP3 players and power amplifiers respectively. If you wanted to, you could solder shielded cables directly to the circuit instead, with the correct plugs on the ends. You’ll never find yourself without the correct connection leads in that case!
Source: Elektor Electronics 12-2006

Wednesday, September 25, 2013
The Reasons Why you should add a DVD Player to your Auto Sound System
When you are in the process of selecting your next auto sound system you might want to check out the systems that include other entertainment features such as games and DVD players. This may sound a little simplistic to some but if youve ever driven cross-country with children, you know what I mean when I say it is worth the investment to have one installed and have it installed correctly.
Many people will debate the wisdom of these devices and I will tell you quite frankly that I feel 100% that this is much safer than trying to deal with disgruntled children in the back that are literally fighting for your attention. If you want to talk about a distraction, I can think of few distractions that will top that while driving in holiday packed roads and less than favorable weather conditions. The truth of the matter is that anything that keeps the kiddies quiet for two hours at a pop has my vote for gadget or gizmo of the year.
I seriously recommend having a system installed however as this will limit not only the distraction to the driver but also the exposure of the lights and sounds to the driver as well. If you have a game system in stalled along with a DVD player and headphones to go with both I am sure you will find that you are driving along listening blissfully to your mom music as the kids in the back take turns playing games and watching DVDs. In fact, the most serious refereeing you are likely to need is over whose turn it is and how long that will last.
Now, I feel that it is very important to point out that this is not the only benefit to having an entertainment system installed for children that are traveling with you. Another very real benefit is the fact that you will also find that you are hearing less and less of the usual "are we there yet" and other generally disgruntled forms of questions from the backset. I also love the fact that the kids can often fall asleep to a DVD that they have seen a few dozen times which will bring a few more minutes of blissful silence as they snooze.
Another unexpected benefit I have found with my children and a DVD incorporated into an auto sound system is that my children are asking less often to stop for potty breaks. I always assumed that some of the frequent bathroom stops were boredom related and now Im fairly certain that my assumptions were correct. Another great thing that mommy does in order to keep things going smoothly is purchase a new DVD immediately prior to taking a long road trip. In addition to a new DVD that the little ones will not yet be tired of, I pull out some DVDs that might have been forgotten recently and not watched quite as often. This keeps the children very happy and quiet while mommy is able to concentrate on the road ahead and keeping everyone happy and safe while traveling.
Just remember that you should never rely on the scenery or the thrill of traveling in order to keep little ones happy and occupied on long trips. Endless questions and chatter are to be expected in order to alleviate boredom. In order to avoid these types of situations youll need more than happy music playing on the radio and really, how many times can you listen to "The Itsy Bitsy Spider" during a 12 hour road trip? Do yourself a favor when selection a really great auto sound system and make the necessary investment to add a really nice DVD player into the mix. Believe me I am the queen of cheap when it comes to trying to save money and will swear up and down that if you have children, this is one investment that is worth its weight in gold.
Subscribe to:
Posts (Atom)