Showing posts with label alarm. Show all posts
Showing posts with label alarm. Show all posts
Saturday, October 18, 2014
Build Emergency Light Alarm
Powered by two AA NI-CD batteries
Four switchable options

Four switchable options
Circuit diagram
Parts:
- R1 220K 1/4W Resistor
- R2 470R 1/2W Resistor
- R3 390R 1/4W Resistor
- R4 1K5 1/4W Resistor
- R5 1R 1/4W Resistor
- R6 10K 1/4W Resistor
- R7 330K 1/4W Resistor
- R8 470R 1/4W Resistor
- R9 100R 1/4W Resistor
- C1 330nF 400V Polyester Capacitor
- C2 10µF 63V Electrolytic Capacitor
- C3 100nF 63V Polyester Capacitor
- C4 10nF 63V Polyester Capacitor
- D1-D5 1N4007 1000V 1A Diodes
- D6 LED Green (any shape)
- D7 1N4148 75V 150mA Diode
- Q1,Q3,Q4 BC547 45V 100mA NPN Transistors
- Q2,Q5 BC327 45V 800mA PNP Transistors
- SW1,SW2 SPST Switches
- SW3 SPDT Switch
- LP1 2.2V or 2.5V 250-300mA Torch Lamp
- SPKR 8 Ohm Loudspeaker
- B1 2.5V Battery (two AA NI-CD rechargeable cells wired in series)
- PL1 Male Mains plug
Device purpose:
This circuit is permanently plugged into a mains socket and NI-CD batteries are trickle-charged. When a power outage occurs, the lamp automatically illuminates. Instead of illuminating a lamp, an alarm sounder can be chosen. When power supply is restored, the lamp or the alarm is switched-off. A switch provides a "latch-up" function, in order to extend lamp or alarm operation even when power is restored.
Circuit operation:
Mains voltage is reduced to about 12V DC at C2s terminals, by means of the reactance of C1 and the diode bridge (D1-D4). Thus avoids the use of a mains transformer. Trickle-charging current for the battery B1 is provided by the series resistor R3, D5 and the green LED D6 that also monitors the presence of mains supply and correct battery charging. Q2 & Q3 form a self-latching pair that start operating when a power outage occurs. In this case, Q1 biasing becomes positive, so this transistor turns on the self latching pair. If SW3 is set as shown in the circuit diagram, the lamp illuminates via SW2, which is normally closed; if set the other way, a square wave audio frequency generator formed by Q4, Q5 and related components is activated, driving the loudspeaker. If SW1 is left open, when mains supply is restored the lamp or the alarm continue to operate. They can be disabled by opening the main on-off switch SW2. If SW1 is closed, restoration of the mains supply terminates lamp or alarm operation, by applying a positive bias to the Base of Q2.
Sunday, December 15, 2013
Heat Detector Alarm Using the UM3561
A very simple heat detector alarm electronic project can be designed using the UM3561 sound generator circuit and some other common electronic parts . This heat detector electronic circuit project uses a complementary pair comprising npn and pnp transistor to detect heat . Collector of T1 transistor is connected to the base of the T2 transistor , while the collector of T2 transistor is connected to RL1 relay . T3 and T4 transistors connected in darlington configuration are used to amplify the audio signal from the UM3561 ic .
Heat Detector Alarm Circuit diagram

When the temperature close to the T1 transistor is hot , the resistance to the emitter –collector goes low and it starts conducting . In same time T2 transistor conducts , because its base is connected to the collector of T1 transistor and the RL1 relay energized and switches on the siren which produce a fire engine alarm sound . This electronic circuit project must be powered from a 6 volts DC power supply , but the UM3561 IC is powered using a 3 volt zener diode , because the alarm sound require a 3 volts dc power supply . The relay used in this project must be a 6 volt / 100 ohms relay and the speaker must have a 8 ohms load and 1 watt power .
Heat Detector Alarm Circuit diagram
Monday, November 11, 2013
Transistor Water Sensor Alarm
This water sensor alarm circuit diagram is designed using common electronic components. Thewater sensor alarm circuit may operate an active buzzer, to make a sound when is reached a certain level of water.
Transistor Water Sensor Alarm Circuit Diagram

Because water sensor and control circuit for buzzer are located on the same printed circuit board, indicator, together with 9 V battery and buzzer can be mounted in a compact case.
When water reaches the sensor, the base of T1 is connected to the positive supply terminal. Therefore, T1 and T2 are open, so that buzzer BZ1, will be activated. Sensitivity reduction of the circuit can be done by increasing the value of R2.
Transistor Water Sensor Alarm Circuit Diagram
When water reaches the sensor, the base of T1 is connected to the positive supply terminal. Therefore, T1 and T2 are open, so that buzzer BZ1, will be activated. Sensitivity reduction of the circuit can be done by increasing the value of R2.
Sunday, October 27, 2013
Alarm Digital Clock
The circuit diagram on behalf of the digital watch. 2x16 LCD is connected to the docks 2 of AT89C51. P1.0 of uC force provide the SCL (entertainment in installments clock) and P1.1 SDA (serial data) for I2C message.
Nearby are four switches connected to the uC, having the status of given away within the think. Function of the keys are same as unmistakable from their names.
at what time the power supply is switched on it willpower confer you the default appointment and schedule, but anon you can convert it to the desired appraise. taking into account setting as soon as, the backup battery will keep the timepiece ticking even after the power is not near.
 |
| Alarm Digital Clock Schematic |
A trivial a propos I2C:
There are basically four most important conditions wearing I2C protocol.
1) Start Condition
2)block Condition
3)Data Validity
4)Acknowledgement
1)Start Condition:
while SCL is sharp and SDA H->L, force take place taken since start condition meant for the exchange of ideas.
2)Stop Condition:
once SCL is high and SDA L->H, will generate a stop condition.
3)Data Validity:
after SCL is high at hand must be refusal chande voguish SDA line lone followed by the data is legally binding, the data loose change be supposed to be there made only as SCL is low.
4)Acknowledgement:
taking into account transfer of lone byte of data the reciever has to acknowledge the sender pro the winning reception. for this the sender add up to the SDA line soaring and reciever pulls down the SDA low, which tells the sender so as to data has reached safely.
Friday, September 13, 2013
Alarm System Circuit 5 Zone
This is a complete alarm technique with 5 self-governing zones fit in favor of a tiny organization or else to your house nature. It uses slightly 3 CMOS ICs and skin tone a timed submission / exit zone, 4 immediate zones and a panic button. nearby are indicators for both zone a "scheme armed" indicator. The schematic is at the same time as follows:
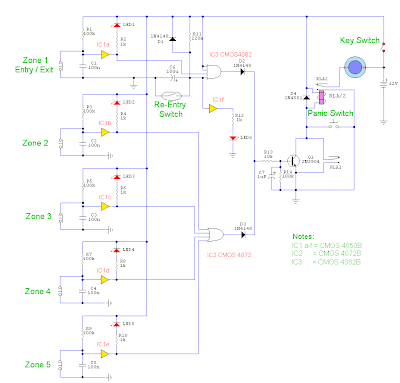
Circuit remarks
both zone uses a normally stopped up write to. These can ensue micro switches otherwise standard alarm contacts (frequently reed switches). right and proper switches can be bought from alarm shops and concealed fashionable gate frames, before window ledges.
Zone 1 is a timed zone which necessity be situated used in the function of the submission and exit feature of the building. Zones 2 - 5 are immediate zones, which choice trigger the alarm with veto delay. several RF invulnerability is provided pro extensive wiring runs by the input capacitors, C1-C5. C7 and R14 too form a transient suppressor. The main switch acts the same as the normal/Unset and Reset switch. For nice security this ought to subsist the metal type with a key.
Action
by switch on, C6 choice charge via R11, this acts as the exit delay and is set to around 30 seconds. This can be altered by unstable either C6 before R11. once upon a time the timing dot has elapsed, LED6 will light, gist the regularity is armed. LED6 may perhaps transpire mounted externally (on the bell box on behalf of case) and provides visual indication with the purpose of the system has set. one time set some get in touch with that opens motivation trigger the alarm, counting Zone 1. To prevent triggering the alarm on entrance to the building, the concealed regarding-entry switch be obliged to live operated. This will discharge C6 and start the entry timer. The re-entry switch may well be a concealed reed switch, located anywhere dressed in a entry frame, but indistinguishable to the eye. The panic switch, after hard-pressed, wish trigger the alarm when backdrop. Relay contacts RLA1 provide the latch, RLA2 organize the warning otherwise buzzer.
Subscribe to:
Posts (Atom)